We have created this guide to help you when upgrading and migrating from version 1 to version 2 of Synthesizer V Studio Pro.
¶ Groups Revised
In Synthesizer V Studio 2 Pro, notes can no longer be placed directly on each track. They need to be inside a group. This is for organizing the workspace and standardizing the behavior across our standalone and plugin versions of the software.
Version 2 introduces several improvements to all group-related workflows. Firstly, a group will now be automatically created when you create a note on any new track. You can also create a new group by double-clicking on the arrangement. By right-clicking a group in the arrangement and choosing the Split command, you can also split a group at any point in the group.
¶ Using Groups with Vocal Modes
A practical advantage of working with groups is that you can divide a track into more manageable chunks of notes and assign a different set of Vocal Modes to each chunk. This gives you more flexibility to transition between different singing styles, without going as deep as a typical automation process.
¶ Editing with Vocal Modes over Other Parameters
Synthesizer V Voices upgraded to version 2 offer more distinctive styles and granular Vocal Mode controls. You may often find one of the Vocal Modes giving a more ideal sound than those achieved by the common parameters (e.g. tension and breathiness).
¶ Customising To Deeper Levels with AI Retakes
AI Retakes, especially when single-clicking the ‘All’ button, now have a much stronger effect on the voice than version 1. In addition, the default take tends to be more stable than the new takes. This means that you’ll often find the voice sounding more dynamic and natural after a few retakes.
¶ Removing and Rebirthing Manual Mode
Synthesizer V Studio 2 Pro removes the Manual Mode from version 1 and replaces it with the new Smart Pitch Control features. But better yet - we’ve provided alternative methods to support your workflow:
¶ Keeping the pitch curve fixed
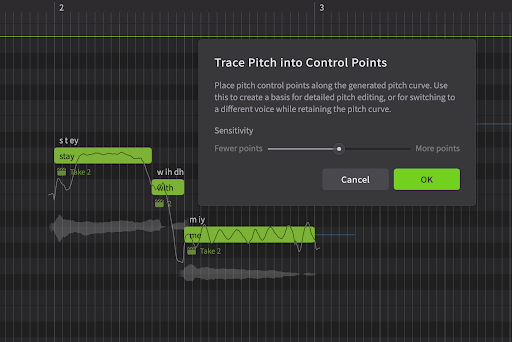
Sometimes it’s desirable to prevent the pitch curve from being affected by further re-renders. For example, if you might want to trace the pitch generated based on one voice, and reuse the same pitch after switching to another voice.
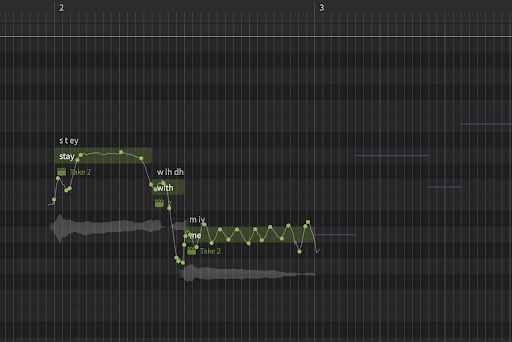
In Synthesizer V Studio 2 Pro, simply select the notes, go to the Modify menu and choose ‘Trace Pitch into Control Points’. This will automatically create control points along the generated pitch curve, ensuring the shape remains mostly intact, while preserving enough flexibility for meaningful edits.
| Before | After |
|---|---|
 |
 |
¶ Creating unique or robotic pitch stylizations
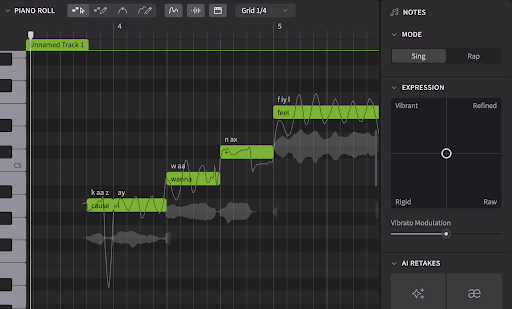
Another use of the Manual Mode in version 1 was for completely bypassing the pitch generation algorithm by using manually specified parameters, even hand-drawn curves to create either robot-sounding or personalized pitch stylizations.
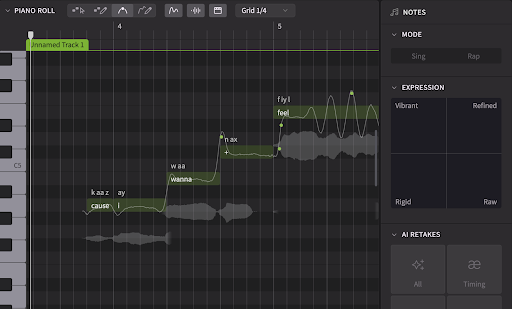
In Synthesizer V Studio 2 Pro, the pitch generation algorithm is always present. Since version 1, we have developed and provided a ‘Rigid’ mode in the expression pad that tells the model to behave like the Manual Mode. Simply select the notes you want to edit, then left-click and drag the joystick pointer control to the “Rigid” corner. This will flatten the pitch curves and create small undershoots or overshoots at the beginning and end of each note.
| Default | Rigid |
|---|---|
 |
 |
Furthermore, pitch control points under Rigid mode will have a similar effect to the pitch curve like the Manual Mode sliders in version 1. They will create vibratos with a stable rate of oscillation, clearly defined note transitions, and precisely controlled pitch offshootings.
It’s even possible to interpolate between the Manual Mode-like behavior under ‘Rigid’ mode with the more natural dynamics from other modes:
Note that Rigid mode is only supported by version 2 voices. Compatibility updates for version 1 voices will have a Stable mode instead, which is more similar to “low expressiveness” settings in version 1.
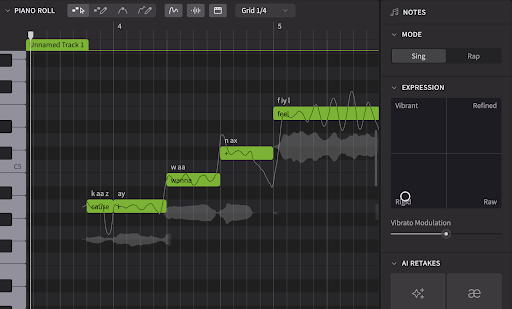
¶ Using Phoneme Timing Instead of Purely Phonetic Notes
Version 1 of Synthesizer V Studio Pro has always lacked a way to precisely specify the beginning and end of phonemes, aside from a set of phoneme duration sliders that can only make relative changes to the length. As a workaround, you may have tried creating short notes containing just a single phoneme, which works to a certain degree.
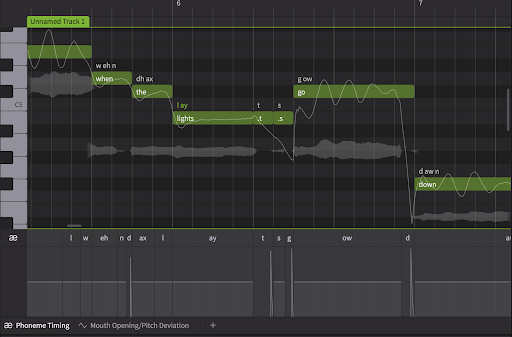
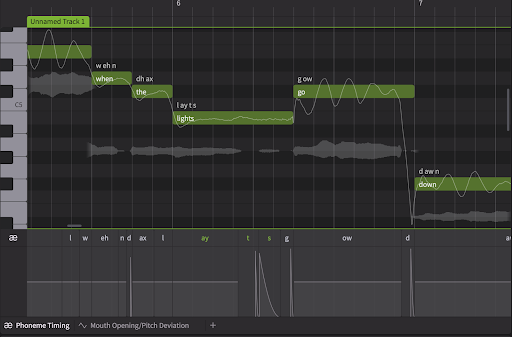
However, Version 2 voices have now been designed to contextualize notes more musically. As a result, notes containing consonants (except breaths) may cause quality degradation, even mispronunciations. Fortunately, we now have a better alternative to placing individual phonemes as notes. Simply use the Phoneme Timing panels to directly drag and resize the phoneme boundary to taste:
| Not Recommended | Recommended |
|---|---|
 |
 |
¶ Importing Projects Created in Version 1
When importing projects created in the version 1 editor into Synthesizer V Studio 2 Pro, and when switching from a version 1 voice to a version 2 voice, please pay attention to the following.
¶ Resetting the AI Retakes
Version 1 voices, including their compatibility updates for Synthesizer V Studio 2 Pro, will have different results from AI Retakes compared to version 2 voices, even for the same take number. A take that worked well for version 1 may not sound ideal in version 2.
We recommend resetting the takes after importing a version 1 project and switching to a version 2 voice.
¶ Re-adjusting the Vocal Modes
Version 2 voices tend to have more distinct Vocal Modes. This however, means that the same combination of Vocal Modes that worked for version 1, may become too strong for version 2.
In addition, if you have tried using standard parameters such as ‘Breathiness’ and ‘Tension’ to make-up for what Vocal Modes were perhaps lacking, you may find that version 2 works better with a different balance between Vocal Modes and these parameters, or in some cases completely switching off the standard parameters.
¶ Watching Out for Pitch Deviation Parameters
Pitch Deviation was extensively used in version 1 as a general solution to bridge the gap (literally) between pitch generated by the system and what the user has drawn. This however, may not work in version 2 since the system could generate a completely different pitch curve to start with.
With this in mind, we recommend the following workflow to workaround this limitation:
- Select all notes with a Pitch Deviation drawn over into Rigid mode on the Expression Pad.
- Go over to [Modify] > [Trace Pitch into Control Points] to effectively convert the Pitch Deviation into pitch control points.