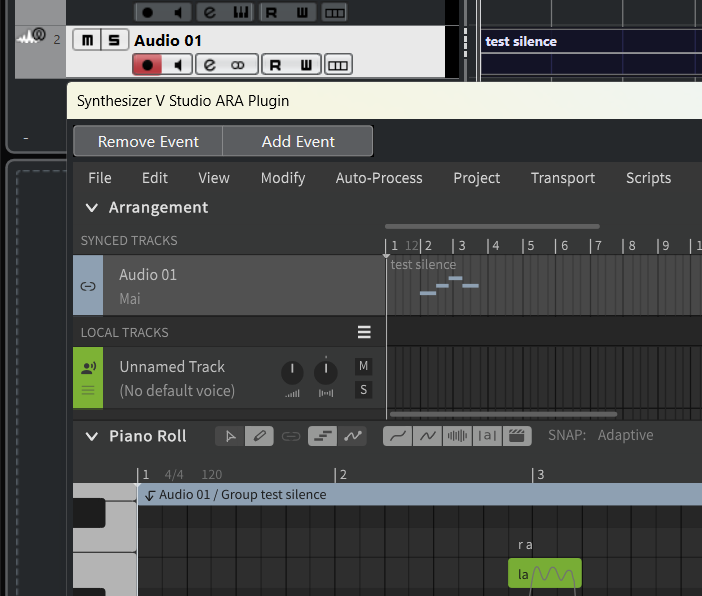
In full ARA mode, the ARA plugin accesses the audio in the DAW, and note groups are created in the plugin corresponding to the placement of the audio clips on the DAW.
You can also use Voice-to-MIDI conversion directly on these note groups without importing audio into the plugin.
For details on installing the ARA plugin, saving the project, and setting the output channels, see "Working within a DAW with a plugin".
A separate audio file is required to use the full ARA mode.
Full ARA mode disables certain features of Synthesizer V Studio, including the creation, copying and pasting of note groups and tracks inside the plugin. Instead, the DAW takes over the responsibility of note group and track management.While the Full ARA mode offers the highest level of capability, it may necessitate adjustments to your workflow. Consider selecting ARA bridge mode if Full ARA mode is not compatible with your workflow.
¶ Host Support Status
Full ARA mode can only be used with the following DAWs.
(The lineups of DAWs that can use ARA bridge mode and full ARA mode differ).
¶ DAWs that Support Full ARA Mode
Studio One 5 or later (Artist/Professional)
Cubase 12 or later (Artist/Pro)
REAPER 6 or later
Cakewalk
ABILITY5 Pro
Full ARA mode is only available in VST3 version, not in the Audio Unit version.
¶ Full ARA Mode Setup
ARA plugins require attaching it to an audio clip on the DAW.
Therefore, a placeholder audio clip is required to use the ARA bridge mode.
The original sound of the audio to which the ARA plugin is attached will not be played.
- Create an Audio Track and import an audio file.
The ARA plugin doesn't work with empty audio events. An audio file is required.
- Add "Synthesizer V Studio ARA Plugin" from VST3 as an event FX from the list of effects.
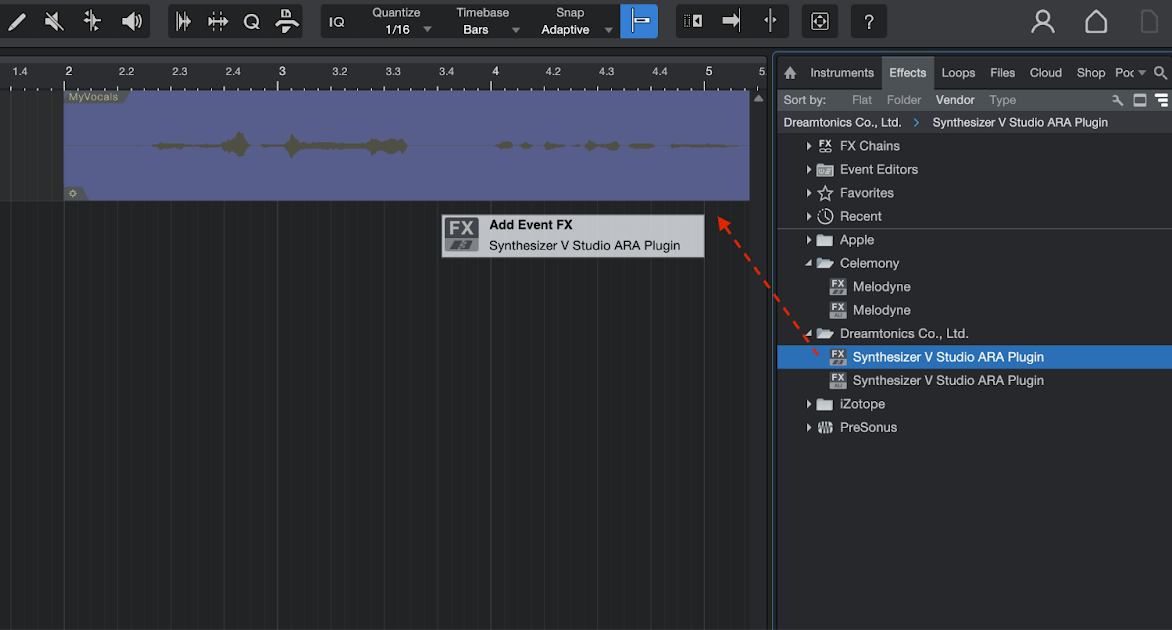
To attach an event FX to an audio event.
In Studio One 6.2 and later versions, drag & drop the "Synthesizer V Studio ARA Plugin" to the audio event.
In Studio One 6.1 and earlier, while holding Alt/Option drag and drop the "Synthesizer V Studio ARA Plugin" onto the audio event.
To load multiple audio events into the ARA plugin, attach the ARA plugin to each audio event.
- Create an Audio Track and import your audio files.
The ARA plugin doesn't work with empty audio events. An audio file is required.
-
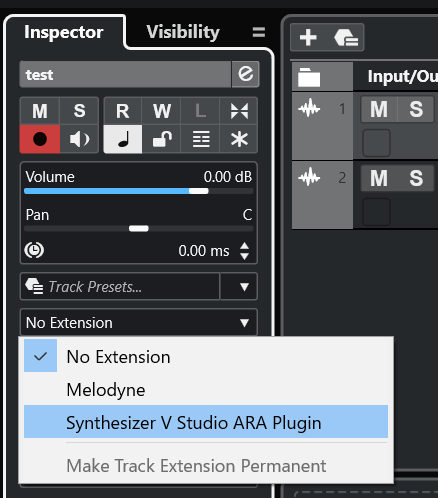
Select "Synthesizer V Studio ARA Plugin" in VST3 from the Extensions menu in the Track Inspector.
-
For tracks in which the ARA plugin is attached, adding new audio events will automatically load them into the ARA plugin.
To load audio from other tracks into the ARA plugin, attach the ARA plugin to each track.
In Cubase, if you record new audio on a track that currently has ARA attached, it will not be loaded into the ARA plugin.
-
Create a track and import the audio file.
-
From the FX menu, select "VST3: Synthesizer V Studio ARA Plugin" and add it.
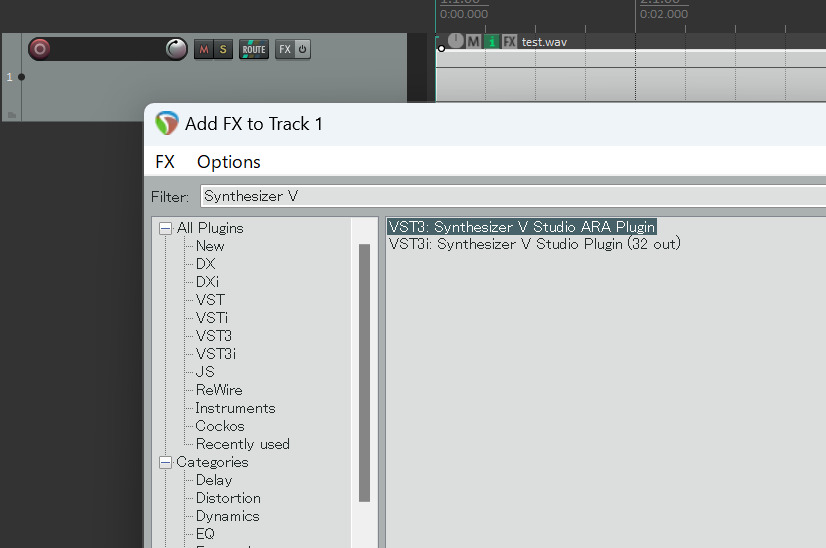
-
For tracks in which the ARA plugin is attached, adding new audio items will automatically load them into the ARA plugin.
To load audio from other tracks into the ARA plugin, attach the ARA plugin to each track.
-
Create an Audio Track and import audio files.
-
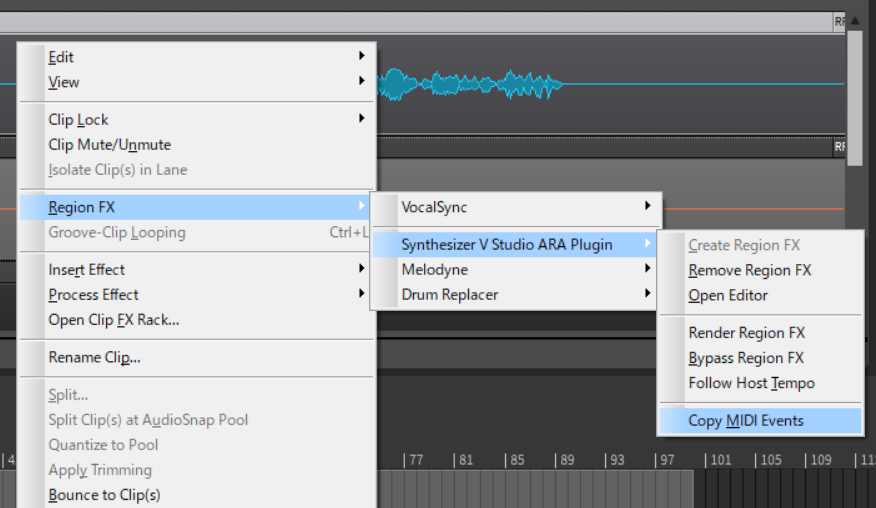
Right-click on the audio clip and select "Synthesizer V Studio ARA Plugin" from the Region FX menu.
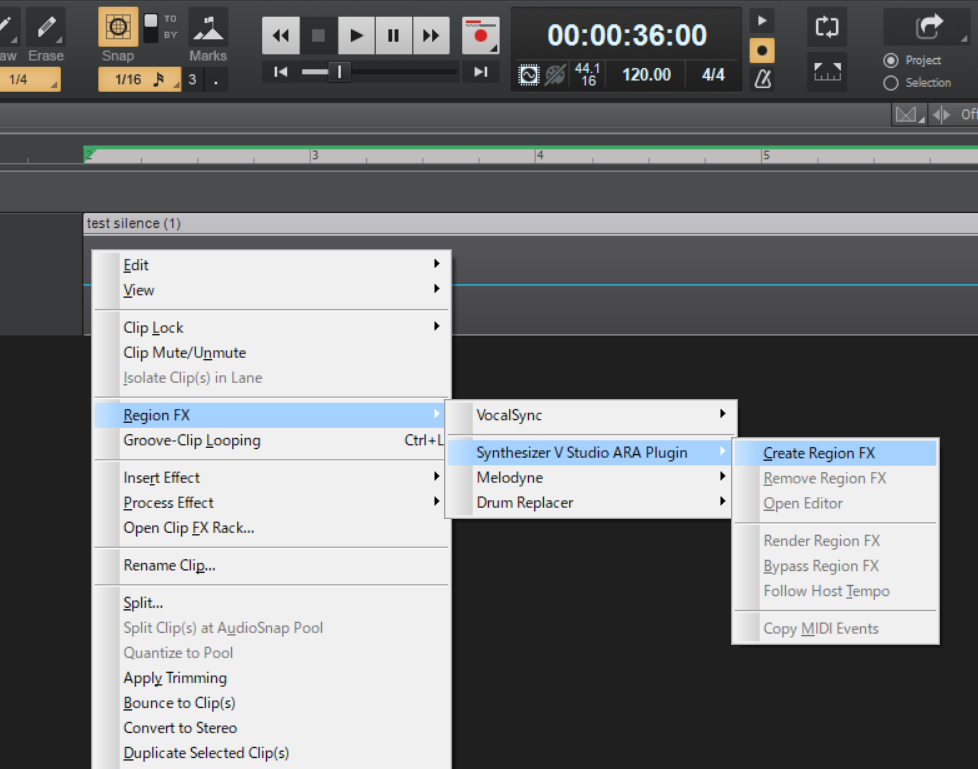
The ARA function cannot be activated properly because it is added as an Audio FX in the following way. Be sure to add it as a Region FX.
- Inserted in the FX rack of a track
- Dragging and dropping the "Synthesizer V Studio ARA Plugin" from the Plugin Browser onto an audio clip
- To load multiple audio clips into the ARA plugin, attach the ARA plugin to each audio clip.
-
Create an Audio Track and import the audio file.
-
Click on the ARA Plugin Menu of the track and select "Synthesizer V Studio ARA Plugin".
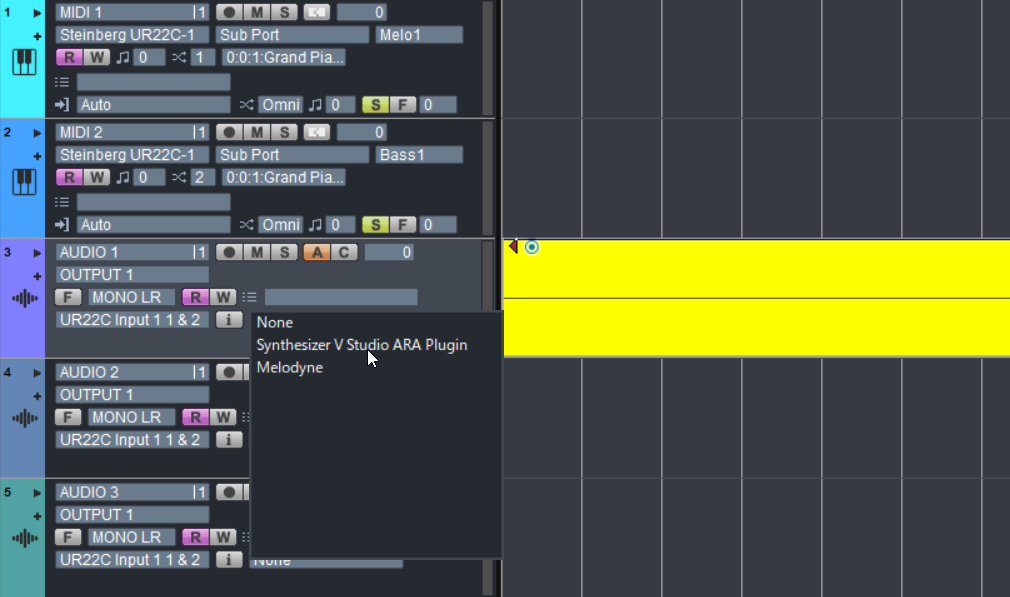
-
For tracks to which the ARA plugin is attached, adding new audio data will automatically load it into the ARA plugin.
To load audio from other tracks into the ARA plugin, attach the ARA plugin to each track.
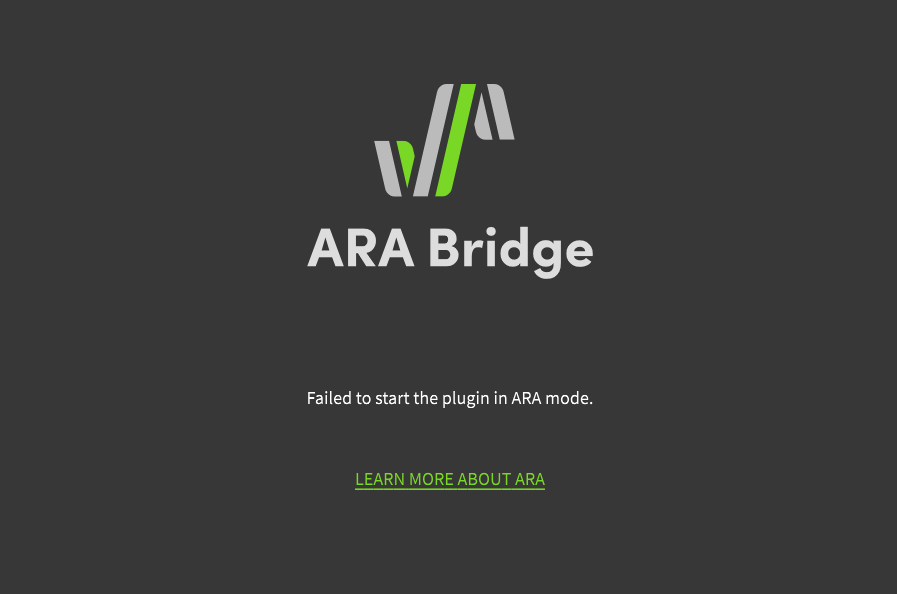
When you see the message "Failed to start the plugin in ARA mode."
The reason could be, for example:
- Using a DAW that does not support full ARA mode
- Insert the ARA plugin as a normal non-ARA effect
- Using the AU plugin instead of VST3
¶ Synchronizing Clip Placement in a Project
When full ARA mode is set up, a Note Group is created on the Sync Track in the ARA plugin for each audio clip on the DAW.
The audio clips and note groups are mirrored and automatically reflect the position and length of the clips.
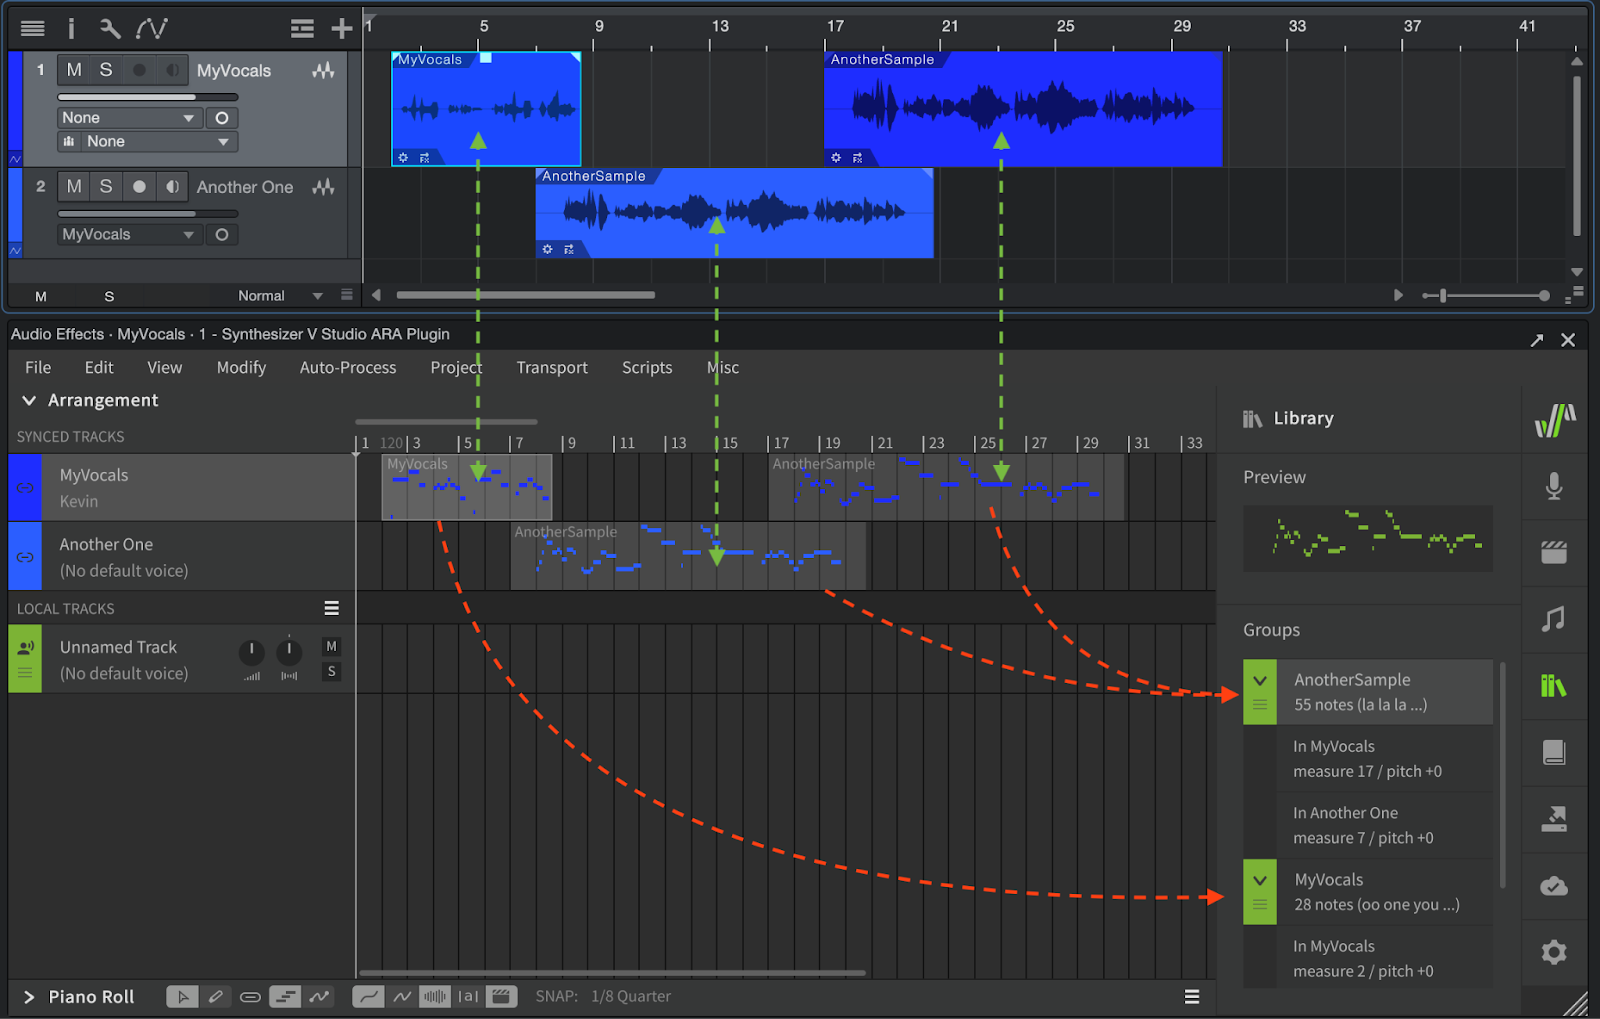
In full ARA mode, work within these note groups by creating notes and control points. Alternatively, use the Voice-to-MIDI conversion function to create notes.
-
In full ARA mode, there are no notes that do not belong to any group (main group). To create a note or control point, the note group to edit must be entered.
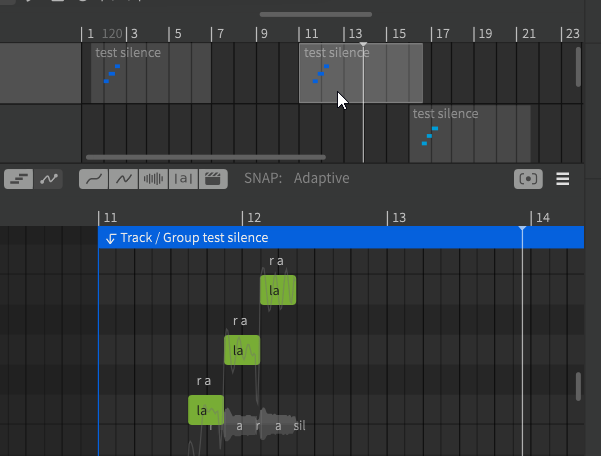
-
Even if a note belongs to a note group, the part of the note that exceeds the length of the note group will not be played.
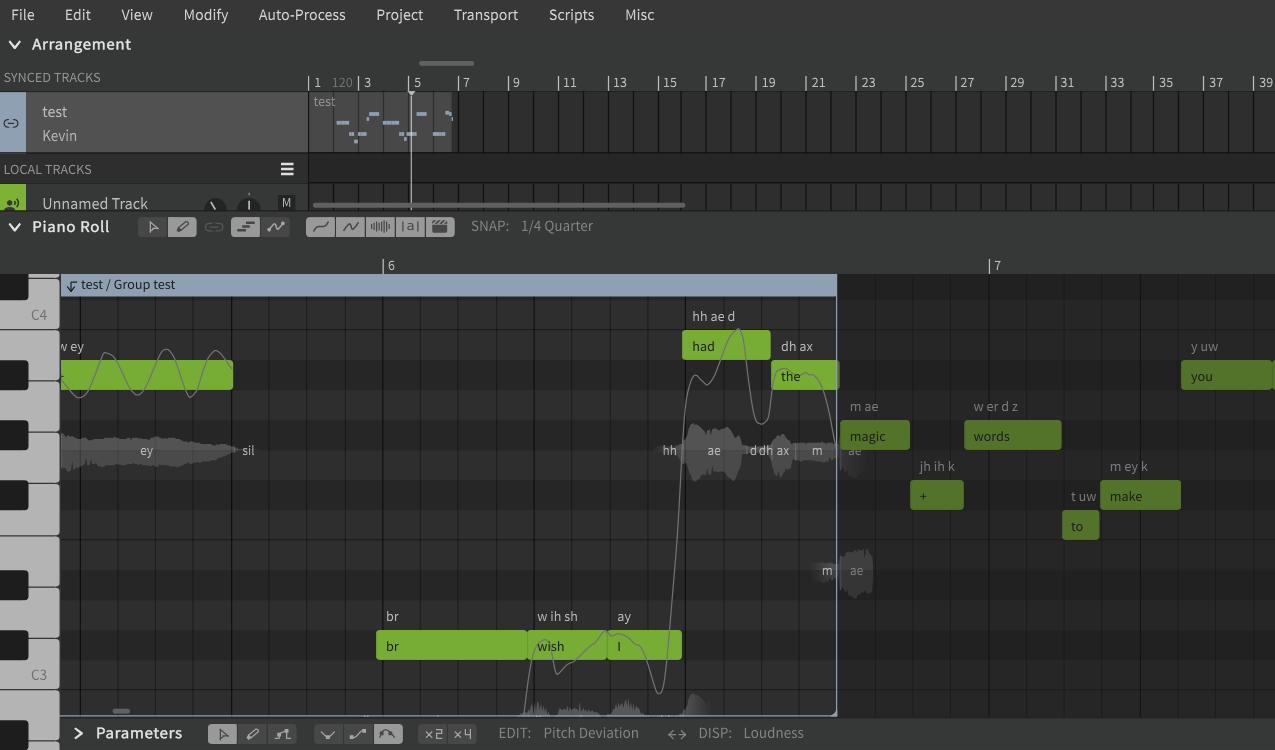
-
It is not possible to create new note groups or move, dissociate, split, or disband groups within the plugin.
-
The original sound of the audio to which the ARA plugin is attached will not be played back.
For details on note group specifications, see "Note Group".
¶ About the Shared Copies Feature of DAWs
Some DAWs have a feature called "shared copies" or "pooling" that allows multiple clips to share the same edited version of an audio file.
This feature can be used between audio clips that reference the same source file.
In Synthesizer V Studio, clips that are shared copies are treated as the same note group.
For example, if there are three shared-copy audio clips on the DAW, the ARA plugin will have three instances that belong to the same note group.
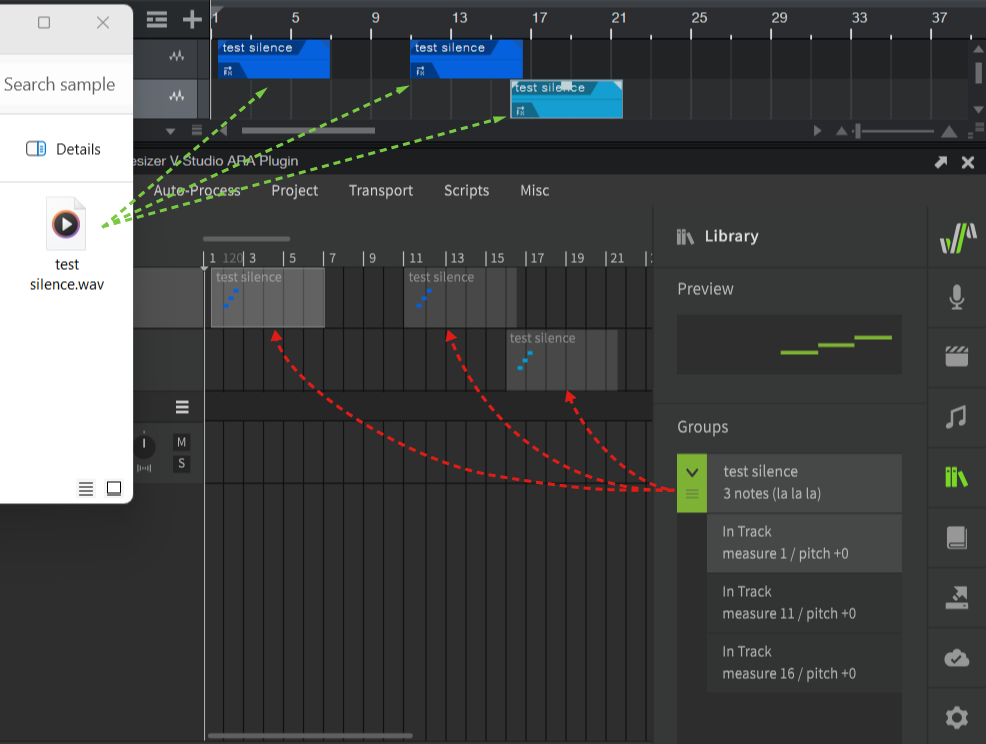
In this case, when you edit a note or control point, the other instances will also share the edited content.
¶ Separating Shared Copies on the DAW Side
Some DAWs have commands to disable the shared copies function and treat each clip as a separate entity.
If you do this on the DAW side, the ARA plugin will recognize the separated audio clips as a new note group.
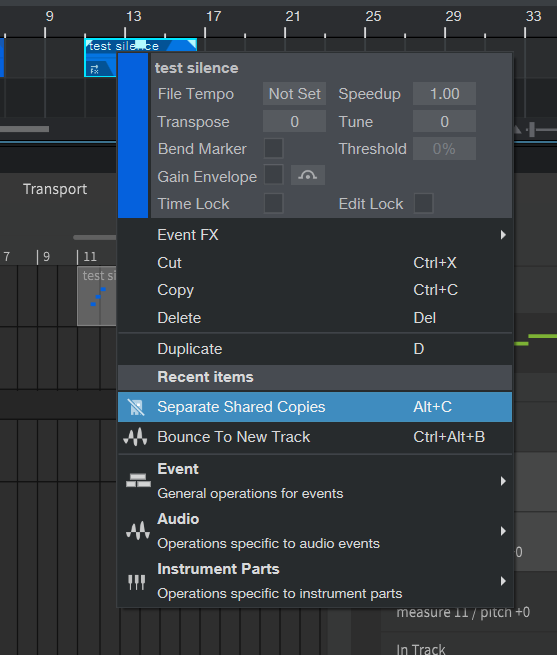
To separate shared copies in Studio One, right-click on an audio event and select [Separate Shared Copies].
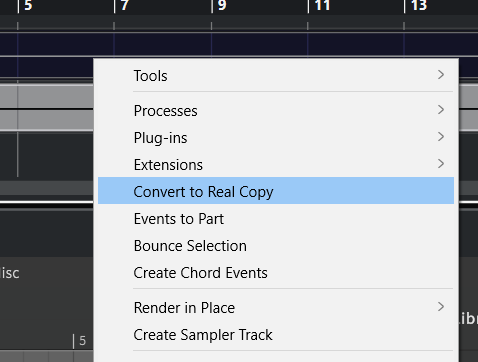
To isolate "shared copies" in Cubase, right-click on an audio event and select [Convert to Real Copy].
Versions prior to REAPER 6 do not have a similar feature and all clips are treated as separate items.
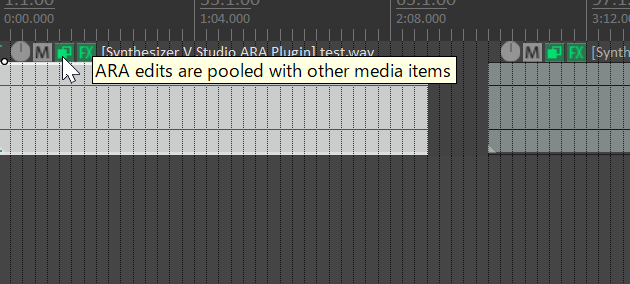
REAPER 7 has a "Pool" feature.
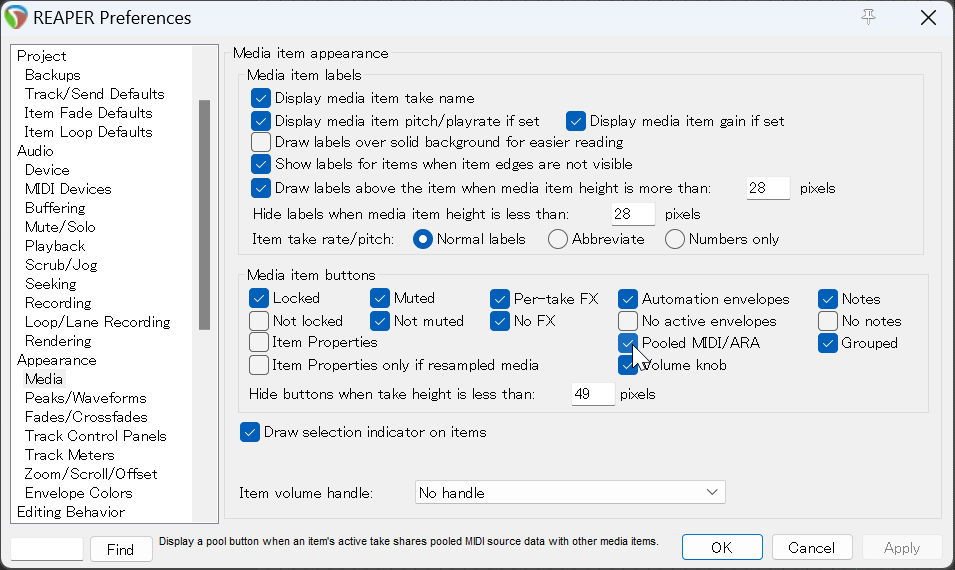
When the Pool feature allows the editing status of an ARA plugin to be shared with other items, an icon appears above the item. By clicking on it, the Pool can be released and the item can be separated.
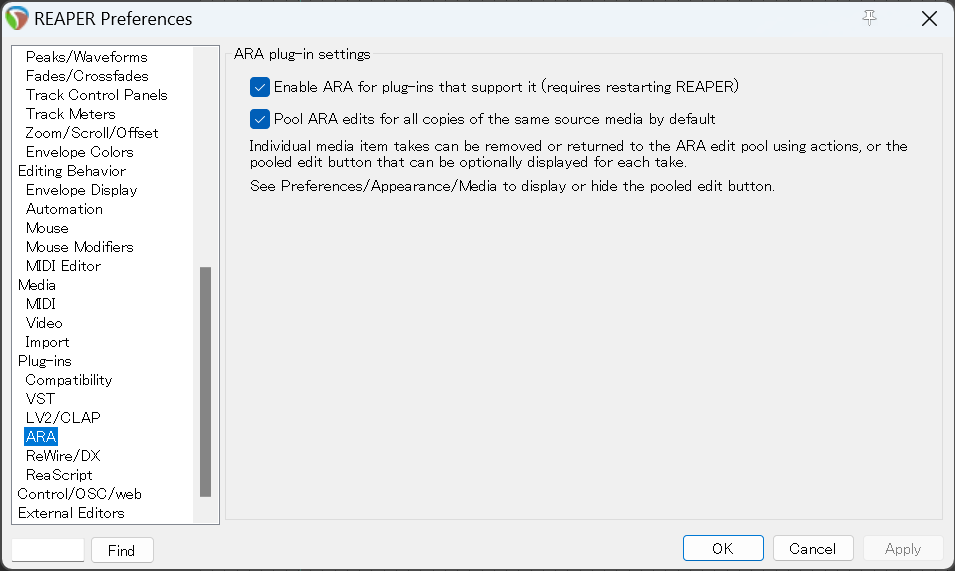
To use the Pool feature by default, go to Options > Preferences > Plugins > ARA in the menu bar and check [Pool ARA edits for all copies of the same source media by default].
To display the Pool button, go to Options > Preferences > Appearance > Media on the menu bar and check [Pooled MIDI/ARA].
¶ Synced Tracks and Local Tracks
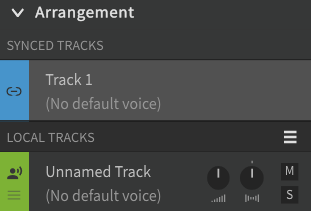
In full ARA mode, there are two types of tracks.
¶ Synced Track
A track whose note groups that are synced to audio clips in the DAW.
The audio from the synced track is routed to the corresponding track in the DAW for output.
¶ Local Track
This track is for importing external files (such as .svp or MIDI files) and is meant to be a transition storage place for the synced track note groups.
Since external files cannot be imported directly into the sync track, the imported data will be placed in the local track. If necessary, copy the imported data to a note group in the sync track.
The Local Track is a temporary storage place for imported data and cannot be used.
- During playback, the audio on the local track is routed to the currently selected track in the DAW (or the track where the clip is selected).
- The local track is muted when bounced and is not included in the mixdown.
- Notes and control points can be created on the local track that do not belong to a note group.
The ARA plugin attaches to audio clips, not to tracks in the DAW.
Therefore, the audio from the local track is not output to a specific track, but is mixed down with the audio from one of the synced tracks during playback.
¶ What You Can Do in Full ARA Mode
¶ Playback and Tempo Sync
As in ARA bridge mode, playback in the ARA plugin will be synchronized with the DAW. Also, the tempo set in the DAW will sinchronize with the ARA plugin.
The tempo cannot be set in the ARA plugin; tempo markers must be entered on the DAW side.
Changing the tempo changes the length (in seconds) of the generated vocals, but does not change the length of the audio on the DAW side, so the length of the note group in the Synced Track may not match the length of the notes in the contents.
If the content of the note group is longer than the audio, the overflowing portion will not be played.
¶ Working with the Voice-to-MIDI Converter
You can use Voice-to-MIDI conversion without importing audio.
Right-click on a note group in the synced track and select [Extract Notes from Audio].
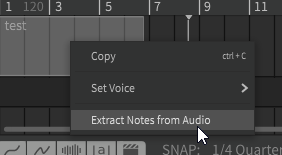
In full ARA mode, using Voice-to-MIDI conversion will erase notes and control points already in the note group and overwrite them with the converted data.
¶ Exporting Notes Directly to the DAW
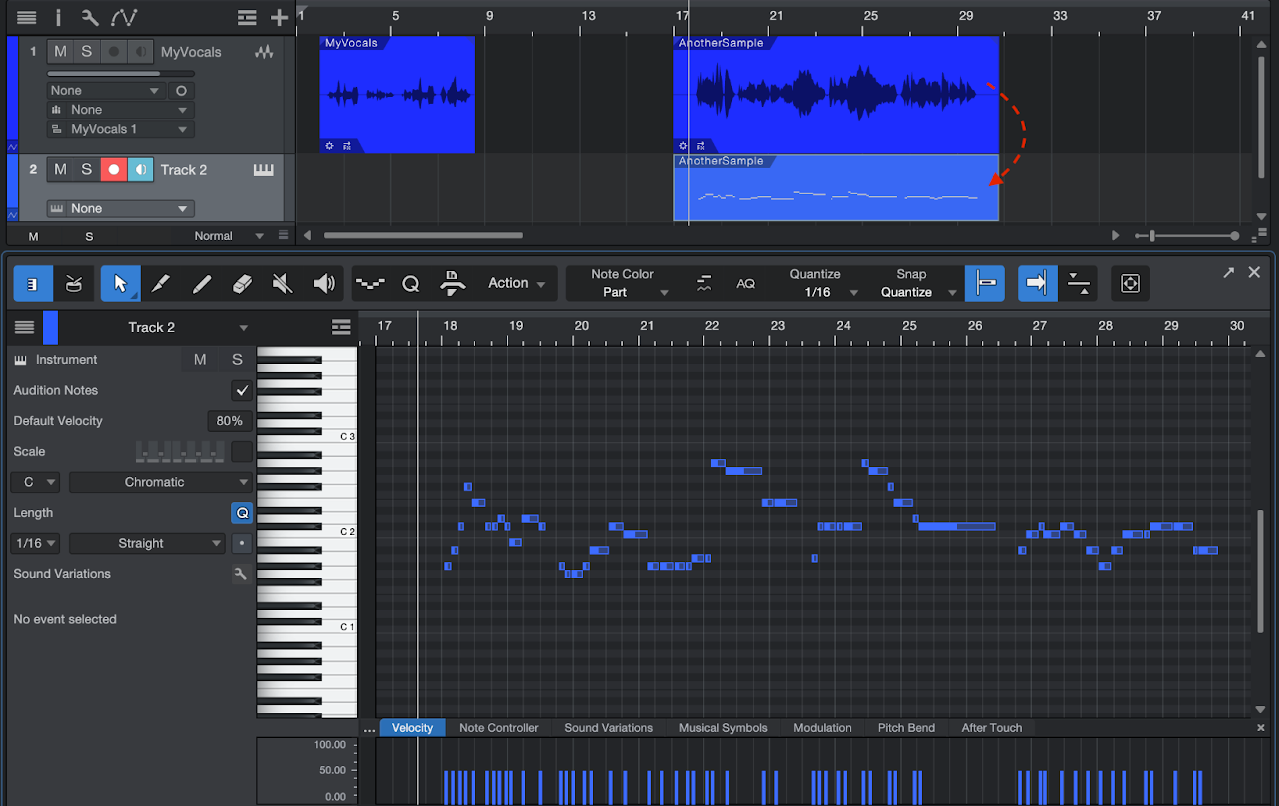
Some DAWs allow you to pass notes from the Synced Track as MIDI clips to the DAW.
In Studio One, drag audio events to an instrument track.
In REAPER, click the + button in the FX window and select [ARA: import into project] > [Notes] to create a MIDI item on a new track.
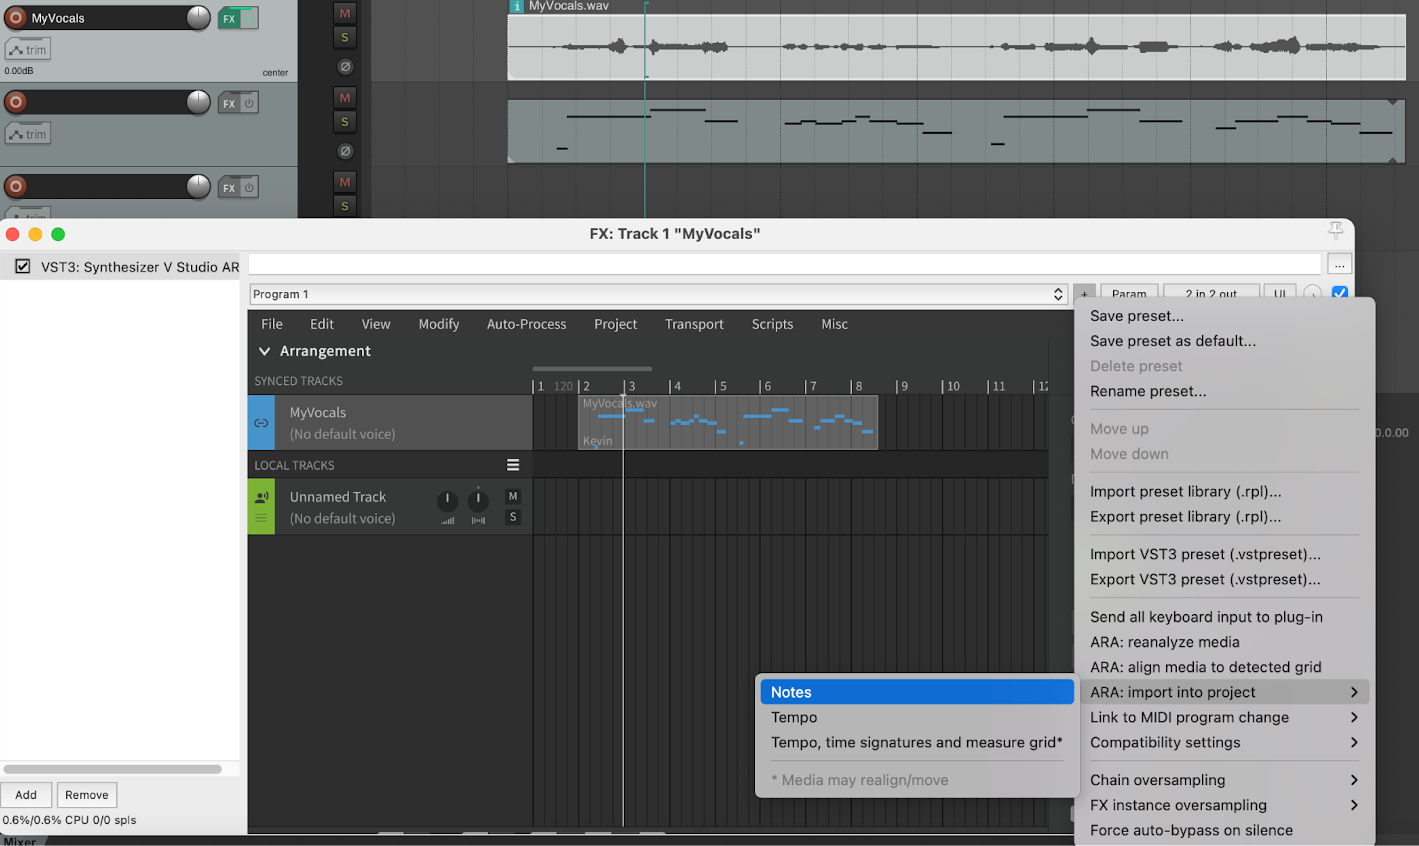
In Cakewalk, notes can be copied to the clipboard by right-clicking on an audio clip and selecting [Region FX] > [Synthesizer V Studio ARA Plugin] > [Copy MIDI Events].
